ZB's Vegan Recipes

Here's where you can find some fun, tasty and generally pretty easy-to-make vegan (and often low GI) recipes. Enjoy!

Friday, October 27, 2006

When things go really really right....

I don't know what's worse - coming up with a recipe in your head that fails first time, or flies brilliantly first time. I've had experience with both, and I've generally found that the second (or third, or ninth) time I make something that flew brilliantly the first time, it goes kaflooey. Whereas with a recipe that fails first time, you've only got upwards to go.

Recently I decided that I wanted to make a quiche. I was trying to figure out what to make with the ginormous bunch of spinach that I've got in the fridge, and as I'd made spinach pie and spinach cannelloni recently, I really wanted a change.

I had a squizz around various sites, and tried to figure out what to put in a vegan quiche that would:

a) mimic the eggy flavour; and
b) set like a standard quiche

So, tofu it was. But of course.

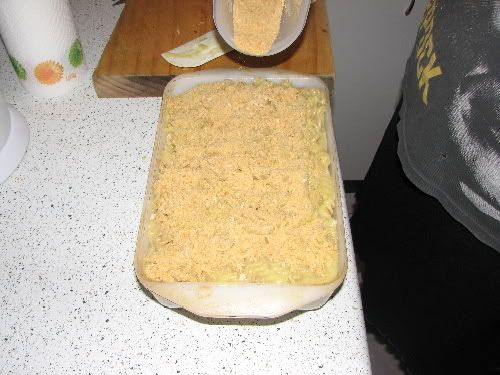
To my surprise, and joy, the quiche turned out (if I do say so myself) quite fabulously. I have to say, I'm insanely proud of my quiche achievement. I would really really love to hear some feedback from anyone who attempts this...

Spinach, Olive and Semi Dried Tomato Quiche

Ingredients

Pastry
2 cups rye flour
1/3 cup nutritional yeast
2 tablespoons oil from semi dried tomatoes
1 to 2 tablespoons olive oil
1/2 cup water
1/2 cup finely chopped spinach

"Eggy Stuff"
2 x 250g packets soft tofu
1 x 250g packet silken tofu
1/2 to 1 cup soy milk
2 to 3 tablespoons vinegar
1/2 cup nutritional yeast
1/2 cup grated Cheezly Cheddar Cheese (this isn't a necessity, but I found it in my health food store on that day and just had to try it!!)
salt
pepper

Filling
1 small onion, sliced thinly
1/2 bunch spinach, stalks and leaves finely chopped
1/2 cup semi dried tomatoes, drained if in oil, chopped
1/2 cup kalamata olives, chopped
vinegar
olive oil

Method

Crust

Preheat the oven to 180 degrees celcius. Put the rye flour and nutritional yeast into a bowl, and evenly pour in the oils. Mix with your fingers until the oil is completely mixed in, and the flour has a crumbly consistency. When you press some between your fingers, it should stay together after you've removed your fingers. Slowly add in the water - you will probably not need all of it - and mix into the flour (I use a bread knife and "cut" the water into the flour). Add the chopped spinach, and mix through thoroughly. Knead until the pastry is smooth and elastic.

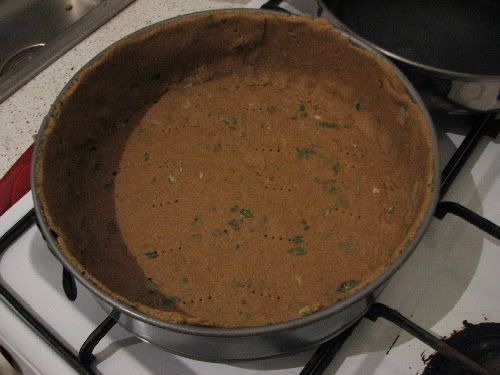
Roll the pastry to about 1 to 2 cm thickness, press into a flan or springform pan, prick with a fork, and bake for about 15 to 20 minutes. Allow to cool.

Filling

Heat the olive oil in a frying pan over a medium heat, and add the onion. Fry until translucent, and add the spinach stalks. Fry for another couple of minutes, and add a splash of vinegar. This will assist in caramelising the onion. Fry until fragrant and slightly coloured (add a little more vinegar if you desire). Add the tomatoes and olives and toss with the onion/spinach stalks for a couple of minutes. Throw in half of the spinach leaves, and stir through until they start to wilt. Take the frying pan off the heat and add the second half of the spinach leaves, and stir through thoroughly. The spinach will continue to wilt a little due to the heat of the pan and the other ingredients. Set to one side.

Eggy stuff

Place all of the tofu into a food processor (seriously, a food processor is absolutely brilliant, and no kitchen should be without one. If you don't have one, you can do this section in a big bowl, with a sturdy fork, and some concerted mashing), and process until mixed together. Add the nutritional yeast and some of the vinegar (this adds to the "eggy" taste). Proces again until smooth - it will be quite thick. Add some soy milk to cut through the thickness, and sease with salt and pepper. If you're using the Cheezly product, add here. Process until really smooth. It should still be quite thick, so don't go too crazy with the soy milk and vinegar!!

Putting it all together

'kay, this is the fun part (I'm with Jamie Oliver - you should work food with your hands as much as possible!!) Throw half of the filling into the pastry crust, and then pour in half of the eggy stuff. Mix together with your hands. Repeat with the second half of the filling and eggy stuff. Gently shake the flan/springform pan to get an even top to the quiche, and top with grated Cheezly (if you've got it - again, not necessary).

Put into the oven, and bake for about 45 minutes to an hour. Check regularly, and turn a couple of times during the baking process. The quiche should be ready when it is cracking around the edges, and set in the middle.

Take it out of the oven, and let rest for a couple of minutes.

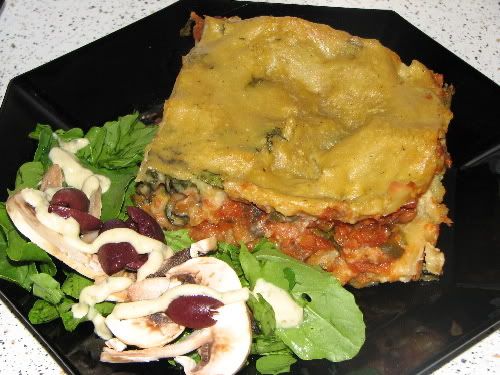
Slice, serve with salady goodness, and share and enjoy!!

Baking Experiments - Orange Squares

'kay, this one was a real experiment, and turned out quite well. I feel like it's the beginning of something (perhaps the much longed for citrus tart....mmmm citrus tart), so more experimentation will take place in the long term.

Again, I started from a base recipe from vegweb. This time it was Time-Warp Lemon Squares, a popular and well commented upon recipe.

Original Recipe Ingredients

Crust:
1/4 cup granulated sugar
5 tablespoons margarine
1 cup all purpose flour
Filling:
3 egg substitutes
3/4 cup granulated sugar
zest and juice of two lemons
1 teaspoon real vanilla
1/2 teaspoon baking powder
1/8 teaspoon salt
3 tablespoon all purpose flour

ZB's Ingredients

Crust:
1/4 cup sugar
3 to 4 tablespoons Nuttelex
1 cup self raising flour
Filling:
1/2 cup home made apple sauce
1/2 cup agave nectar
zest and juice of two oranges
1 teaspoon vanilla essence (man I've got to stop using that stuff - it's revolting! Vanilla beans from here on in...)
5 tablespoons self raising flour (I upped the flour to 5 tablespoons, due to the increase in wet ingredients via the agave nectar, but 4 is probably enough)

Method:

Preheat oven to 180 degrees celcius. Combine crust ingredients and press into 8 by 8 inch pan (I used a loaf pan, which is about 20 cm by 7 cm). Put into the oven to bake for about 15 minutes. Take out and let cool for a little while.

Whilst the crust is baking, put the applesauce in a bowl, and add the rest of the wet ingredients. Add the flour tablespoon by tablespoon, until you have a creamy, pourable mix. Pour over the crust, and bake until set.

Let cool and slice into bars.

Here are my Orange Squares:


I would probably lose the vanilla flavour all together, and up the citrus flavour - maybe a mix of orange and lemon. The sweetness was just right, and the consistency of the filling was quite fudgey. I need to find a way to achieve the fudgey consistency without the floury taste - or lose the fudgeyness all together, and find a way to move towards more of a tart consistency.

I really liked these, and think that with some further experimentation and deciding on a recipe I'm happy with, I'm going to move these into my "special occasion" baking area of my brain. I'll update with changes to the recipe next time I make them!

So, try out the original, fiddle with my changes, do some fun baking and share and enjoy!

Thursday, October 26, 2006

Comfort Food = Pasta Bake

When I'm feeling a bit down, or tired, or lazy, or I just want something to make me feel like the world isn't a god awful place, I want comfort food. Comfort food takes a variety of forms for me - oddly enough, not so much with the chocolate as comfort food. I'm a much more savoury oriented woman (don't get me wrong, though - vanilla So Good icecream topped with sliced banana and melted chocolate? Totally comforting...)

So, I like to make pasta bakes - hearty, soft, crunchy, flavoursome. My most recent pasta bake was MacNCheez style (but with standard and wholemeal spirals rather than macaroni...)

SpiralsNCheez

Ingredients

A 500g packet of San Remo Wholemeal spirals (I make enough for dinner and lunch for two [very hungry] people, so I use a lot of pasta)
1 1/2 cups of Casheez mix
3 cups of water
1/2 cup of mushrooms, sliced
1/c cup home made bread crumbs
Nuttelex
Method

Just a note on the breadcrumbs: I like to make my own, because a) it's a waste to buy them when I have been known to throw out bread 'cos it went off before I did anything with it, and b) it's so damn easy. My mother used to do it (and I hated it!) and there's really nothing to it. Take your old bread (obviously, if it's mouldy, throw it on the compost!), lie it on a metal rack, put it into a slow oven [about 15o degrees celcius] and cook until the bread is dry, kind of brown and crumbly. About half an hour, I think. Create bread crumbs by either placing the bread between a folded clean teatowel and beating the hell out of it with a rolling pin, or by bunging into a food processor. Store in an airtight container.

In a large pot, boil water for the pasta (you can salt the water if you wish). Grease a casserole dish with the Nuttelex. While the pasta is cooking, make up the Casheez Sauce.

Pour a layer of pasta into the casserole dish, top with mushrooms, and then pour about a third of the sauce over the pasta. Repeat, reserving the most sauce for the top layer of pasta. When you've covered the pasta in sauce, top with breadcrumbs.


Bung into a medium hot oven, about 180 degress celcius, and cook until the breadcrumbs are brown and crisp. This tastes great straight out of the oven, but also brilliant cold the next day for lunch!


Serve with lots of salad greens, and share and enjoy!!

Wednesday, October 25, 2006

Baking experiments - Orange/Grapefruit Biscuits

Unfortunately, baking is where my confidence in cookery (and especially vegan cookery) falters a bit. There are a few things that I know how to bake, and bake well, and I will post them eventually. However, I always want to learn a bit more, and find other things to cook.

The most daunting thing about vegan bakery is replacing eggs. I've found that homemade apple sauce (cook peeled chopped apples in water until they become a smooth sauce), well mashed banana, or ground linseed mixed with water make great egg replacers. I don't really like Egg Like because of its distinctive taste - but I think I'll give it another go some time soon.

So, what I generally do is go to vegweb, find some recipes, and experiment. The results of these experiments range from "Woo hoo!!" to "...ummmm" to "I see where you were going with this..."

I thought I'd share my recent bout of baking with you, and give you my thoughts on how the experimental recipe-jiggin went...This round of baking was brought on by the need to use up a lot of oranges - I have been reduced to only 2 serves of fruit a day on my new dietary regime (as opposed to about 4 or 5), and thus I am finding myself with lots of fruit going begging. I don't want to waste it, so finding new ways to use it up is very important to me.

I should note that these interpretations of recipes are not particularly low GI friendly, though I did try to jig them in that direction...

So. First off I made a version of Lemon Tea Cookies. The original recipe ingredients (as you can see from the link) went something like this:

Original Ingredients

2 teaspoons lemon juice
1/2 cup soymilk
1 3/4 cups flour
3/4 cup sugar
1 teaspoon baking powder
1/4 teaspoon baking soda
1/4 teaspoon salt
1/2 cup soy butter
1 tablespoon flax seed (linseed) combined with 3 tablespoons water
1 teaspoon grated lemon rind
Lemon glaze: 3/4 cup sugar and 1/4 cup lemon juice

The ZB version of the ingredients

1 cup orange and grapefruit juice
1 cup self raising flour
3/4 cup steel cut oats, ground to a coarse flour
1/2 cup canola oil
3/4 cup sugar
1 tablespoon flax seed (linseed) combined with 3 tablespoons water
grated rind of three oranges

Method

In one mixing bowl, beat the canola oil for about a minute, then add sugar and beat until thoroughly combined and as fluffy as you can make it. Add the linseed mixture and orange rind and beat well (I found that the linseed mixture helped the oil and sugar to beat together better).

Add the flour and oat flour to the above mixture, alternating with the juice, until well combined.

Drop from a teaspoon onto an ungreased biscuit tin. They will spread when baking, so make sure you leave a good deal of space around them. From a heaped teaspoon of batter I got biscuits that were about 3 cm across. Bake for 15 minutes, or until golden around the edges.

Remove from biscuit tin and cool on a wire rack.

Here they are:


Out of the bakery experiments from this past Sunday, I found these to be the best. The disappointment is that they smell very citrusy, but don't deliver on the taste. They taste like...biscuits.

I think what I'd do next time is reduce the amount of sugar, and definitely use lemon instead of orange - lemons have such a strong taste, and the orange is totally lost in this biscuit mixture.

One of the frustrating things about getting recipes from international sites, US especially, is that I'm often not familiar with the expected flavours of the food that I'm cooking. The cuisine is so very different between the US and Australia - I find the US recipes contain much more sugar than I am used to. However, the joy of cookery comes from experimentation, which is why I keep trying!

Make your own changes - or follow the original recipe to a T - let me know how it turns out, and share and enjoy!

Spicy spicy beans...I love them spicy beans

The mainstay of any vegan diet should be legumes - we've got to live up to the "farty vego" tag somehow, eh? I find TexMex food one of the best ways to consume legumes - traditionally you can use red kidney beans in pretty much everything, and I've started to branch out to using other types of beans.

Most recently, I gave black eyed beans a bash. I was actually going to try and make a version of dumplings I get at yum cha, containing black eyed beans, ginger and hoi sin sauce, but decided to go with something easy and not-having-to-think-too-much.

So, this is my standard spicy beans recipe. You can use whatever types of beans you want, and mix and match the recipe to your heart's content. That's what cooking is all about, after all - looking at a recipe, or eating a food, and going..."Hmmm, if I do this and that and the other thing, I will have either something I'm going to love to eat, or an odd pile of mush...or both..."

Spicy (or not so spicy) Beans

Ingredients

Either:
2 400g cans beans, rinsed; or
1 400g can beans, rinsed, and 1 400g can refried beans; or
1 cup of dried beans, soaked overnight and cooked in slightly salted water until tender
2 400b cans tomatoes
However much garlic you like, minced (I like lots and lots)
1 medium onion, chopped
1 to 2 chillies, minced (obviously, this depends upon the heat of the chilli - big 'uns are generally milder than little 'uns, and be careful if you decide to go with habeneros, 'kay?)
1 to 2 teaspoons of ground cumin
1 to 2 teaspoons of ground coriander
1 to 2 teaspoons of ground chilli (for extra kick)
juice of 1 lemon
1 vegan stock cube
1/2 tablespoon of cocoa (optional)
olive oil

Method

Heat the olive oil in a frypan over a medium heat. Throw in the garlic, onion and chillies. Fry until the garlic and onion are translucent, but not coloured. Add the beans (if you're using the refried beans, you add them a little later), and stir to coat with the garlic/onion/chilli. Add the ground cumin, coriander and chilli, and stir vigourously - you're looking to "cook" the powder (so that the end result doesn't taste powdery), but you don't want to burn it. Also, try to coat the beans as much as possible. Pour in half of the lemon juice to deglaze the pan (liquid to lift up the spices and bring them all together and assist in stopping burning!).

Now, add the tomatoes and mix thoroughly. Keep the tins to one side, and half fill with water. If you're using the refried beans, now is the moment to add them to the mix and stir through completely. Crumble the stock cube into the sauce, and pour in the last of the lemon juice, and the water from the tomato tins.

Stir to mix, and keep on a medium heat. Keep cooking until all of the liquid has evaporated, and the spicy bean sauce is thick and making "volcano" noises (it's like exploding lava - it will spray all over your stove top). Remember to stir regularly, because this will stick - especially if you've added refried beans.

Serving suggestions

I actually use the bean mix as a base for lots of things - I love to add lots of veges, such as broccoli, mushrooms, green beans - and use in:

Burritos or Nachos, with guacamole, lots of lettuce and fresh tomato, olives, chopped pickled chillies...

Poured over potatoes for a really hearty winter meal...

Served with rice and salad...

I've even made a bake out of the beans, layering them with rice and Casheez Sauce, baking and serving with salad.

So, make the spicy bean base, experiment with the ingredients, and share and enjoy!!

Sunday, October 22, 2006

Peanuts + Soba + Veges = Nummy Goodness!

So, this is not a recipe for those of you with peanut allergies - or anyone who feels in any way precious about peanut sauce recipes.

This has become a regular dinner at my place, ever since friends of mine made it at their place one night. I became obsessed with replicating it sans recipe, and developed my own version (which is slightly different every time I cook it, depending on what's available at the time).

The mainstays of this meal are: peanut butter, soba noodles and fresh crisp veges, cut into approximate matchsticks. Pretty much whatever else you put in is up to you! My favourite type of recipe...

Peanutty Soba Noodles

Ingredients
Peanut Sauce

2 tablespoons peanut butter
1/2 to 1 tablespoon miso
1/2 to 1 tablespoon hoi sin sauce
1/2 to 1 tablespoon soy sauce
1/2 tablespoon palm sugar
1 tablespoon ginger, minced
1 tablespoon garlic, minced
1 tablespoon chilli, minced (if you don't have fresh chillies, I often use a "hot and spicy" sauce that I get from Vegan's Choice - or you could use sweet chilli sauce and omit the palm sugar)
1 spring onion, white part chopped (reserve the green part for the garnish)
1/2 cup water
juice of 1 lemon
olive or canola oil for frying

Veges

I generally use carrots cut into matchsticks, green beans sliced thinly on the diagonal, mushrooms sliced thinly and if I've got 'em, snow peas sliced thinly on the diagonal. I've also used thinly sliced leek as a main vege, and broccoli and cauliflower sliced thinly. The only veges I probably wouldn't use are "winter" veges - potato, sweet potato, pumpkin etc.

Soba Noodles and Garnishes

I'm a soba noodle fan, so I use quite a lot. Generally about 2 bundles should feed 2 to 3 people.

As far as the garnishes go, when I first had this meal made for me, it was served with wakame for crumbling into it, and gomashio. I think I've made it a little more Indonesian style than Japanese style - though mostly it's just ZB style, so...

I find it essential to finish this meal with a drizzle of sesame oil. The green part of the spring onion, thinly sliced, sprinkled on top is lovely. I often add sesame sprouts, which are lovely and crunchy and very mustardy. The garnish just adds an additional freshness to the dish.

Method

Noodles

Put a big pot of water on to boil. It doesn't need to be salted, as the soba noodles contain salt. When the peanut sauce is complete, put the noodles in the boiling water and cook to directions (generally about 5 minutes). When cooked, drain and cool with cold running water.

Peanut Sauce

Heat the frypan over a medium heat. Splash in a little oil (if using) and the garlic, ginger and chilli. Cook until fragrant, but not coloured. Add the spring onion, and cook for a moment. Pour in the hoi sin sauce and add the palm sugar, and move around until the palm sugar has melted. Add the peanut butter, and mix together thoroughly. Pour in half of the lemon juice, and add the miso. Mix until combined. Pour in the water (adding more if the sauce is too thick - it should stay quite thin, so that there's enough to coat all the veges and the noodles), the soy sauce and the rest of the lemon juice.

Leave over a low heat to simmer - if it thickens too much, add a little more water, and bung the noodles on and jump straight to the next step!

Putting it all together

I generally put the beans into the peanut sauce whilst it's still on the heat, just to cook them a little.

Take the peanut sauce off the heat, add the veges, and stir them through. Add the noodles, and stir so that the noodles are coated with the peanut sauce and veges. Using tongs, transfer to bowls and top with garnishes of choice (don't skimp on the sesame oil - it's gorgeous tasting!)

Grab some chopsticks, and share and enjoy!!

Thursday, October 19, 2006

Munchin' on some toasted muesli, yee-aaahhh

So, when I was a girl (back in the era of dinosaurs, almost having my head taken off by pterodactyls etc etc) I can remember my grandmother (though, with my memory, it really could have been my mother or my aunt) making toasted muesli. She'd make up the mix, spread it out on a baking sheet, and toast it in the oven.

I hated it.

Hated the taste, hated the smell, hated the icky healthiness of it, hated the texture...

Hated it.

Fast forward twenty five years, and I present to you:

ZB's Toasted Muesli of Doooooommmmm

Ingredients

1 cup rolled barley
1/2 cup steel cut oats
1/2 cup linseeds (otherwise known as flaxseeds)
1 cup raw hazelnuts, semi pulverized (I squish 'em with the side of my big ole chef's knife, and then cut 'em up a bit)
1/2 to 1 cup red flame raisins (or sultanas of some sort)
1 cup juice (apple and blackcurrant is great, but orange is also good...)

Process

Turn the oven on to about 150 degrees celcius. Line a biscuit tray with non-stick paper/baking paper.

Mix all of the dry ingredients together. Pour the juice over the dry ingredients and mix in thoroughly. Let the mix sit for a little while so that the juice can really soak in.

Spread the mix thinly on the baking tray - you're going to have to do at least two lots. Don't be tempted to pile it up - you'll just end up with warm goop (trust me, I did that last time I made this).

Put the tray into the oven, and bake for about...15 to 30 minutes, turning every 10 minutes or so. You're looking for a dark golden colour, a gorgeous smell, and dry texture.


Spread out on a plate to cool, and cook the rest of the mix. When all of the mix has cooled, put into an airtight container.

Serve with fresh fruit and soy milk (I like to leave my soymilk on it for about 5 minutes before eating, to let the muesli soften up a bit!)

Share and enjoy!

[chanting]Couscous! Couscous! Couscous![/chanting]

For some reason, every time I think of couscous, I have this image pop into my head from the (original) King Kong, of the drums going and the chant of "Kong" echoing through the valley. Though with "Kong" replaced by "Couscous".

Yeah. My brain is a fun place to visit, but believe me, you don't want to live there...

So until recently, never really got into the whole couscous experience. Tried it occasionally, but didn't really do much for me. However, with the new gaping-hole-lack-of-rice in my diet, I'm experimenting with all sorts of grains/pastas/seeds to try and fill that void.

So, without further ado, here's my first couscous recipe:

Baked Veges and Couscous Warm Salad, served with Seared Tofu and Asparagus.

(oooohhhhh, fancy pants...)

Ingredients

Salad

1 large potato, cubed
sweet potato, cubed (twice the amount as the potato)
1 medium to large beetroot, cubed
2 medium carrots, sliced into rounds
1/2 cauliflower, cut into little florets
handful of garlic cloves, still with skin on (or you can use an onion, cut into wedges)
salt
peppercorns
olive oil
1 cup couscous
1 cup water
1 tablespoon Nuttelex

Seared Tofu

3 to 5 tablespoons of soy sauce
1/2 tablespoon agave nectar (or you can just use kecap manis - sweet soy sauce)
2 to 3 tablespoons of vinegar
juice of 1/2 lemon
pepper
150gm firm tofu (see Process for preparation of tofu)

Additional ingredients

Asparagus, with the woody ends taken off, cut into about thirds.

Process

Seared Tofu

Firstly, the best way to get some serious flavour into tofu, and also to change the texture to be more chewy and fun to eat, is to freeze your block of tofu. Defrost completely, and place between paper towel/clean tea towel and press firmly for at least 30 minutes - place a chopping board on top of the tofu and weight it down. This gets rid of all of the excess moisture, and makes the tofu incredibly sponge-like. I generally slice the defrosted tofu into the shapes I want prior to pressing it, which can make the process quicker. Also, you don't have to freeze it, you can just press it for a while.

Don't, however, try this with silken or silken-firm tofu. That way sobbing and waste of soy product lies.

Anyhoo, back to the recipe. Make up the marinade of the first five ingredients, and place the sliced (about 1cm thick) tofu in the marinade. Seal/cover, and put in the fridge for the duration of the couscous salad cooking.

Once the couscous salad has been made, heat a little oil in a frypan over quite a hot flame, remove the tofu from the marinade (reserve any marinade left over!) and cook the tofu quickly, until it is brown and slightly crisp. It shouldn't take more than about 5 minutes to cook all of the slices. Once they're cooked, take them out of the pan, and throw the asparagus in. Toss the asparagus really quickly over the heat for about a minute, and then remove from the pan.

SaladTake all of the chopped veges, and the garlic, and place in a baking dish. Toss in some salt and peppercorns, and drizzle enough olive oil over the veges to have them glisten. Mix everything together thoroughly, and place in a medium hot oven - about 180 degrees celcius - and cook until all of the veges are tender. This will take anywhere between 45 minutes and an hour and a half. This is not a recipe for the fast movers amongst us...Make sure to stir the veges occasionally, and turn the baking dish every half hour or so.

Once the veges are all cooked, take out of the oven and set aside to cool a little.

Place 1 cup of water in a saucepan, and put over a medium heat. Add the tablespoon of Nuttelex and wait for the water to come to the boil. Take the water off the heat, add the couscous, stir until thoroughly mixed, and set aside for about 5 minutes. The couscous will expand quite impressively. Fluff the couscous with a fork, and pour into a bowl.

Add the baked veges, and mix together.

Take the leftover marinade, add some more lemon juice, maybe some sesame oil and a little more soy (if necessary), to make a dressing, and pour over the couscous and veges. Stir through.

Cook the tofu and asparagus as instructed above. Put a big pile of couscous salad on a plate, and top with the tofu and asparagus.


Share and enjoy!

Wednesday, October 18, 2006

What's it all about?

I have wanted to start a recipe blog for a while now - I enjoy writing my other blog, though I don't update it as often as I should. Part of that is because I've become even further enamoured of cookery than I used to be, and that's how I'm spending my time. (The other part of the reason is that I'm lazy, but we really don't need to discuss that...) I could just post recipes at one of the excellent vegan recipe sites (such as vegweb), but I'm kinda self involved, so I'm going to go it alone :-D

A little bit of history to me that might help explain what I'm doing with this blog.

I'm 31, and have been vegetarian on and off for about half of my life. I went fully vegetarian in 1997, and became vegan in early 2003. I loved the change, I felt healthier, happier and more in touch with the world (human and animal) around me, and don't ever see a reason for not being vegan. My dream is to run a vegan cafe, and if I just had untold amounts of wealth, I would totally start doing that ;-)

I have been cooking since I was about 9 years old. I've always loved food, and experimenting with flavours, and cooking healthy robust tasty meals. I began a chef traineeship in my early 20s, working in a French restaurant (an interesting experience for a vegetarian!), where I gained some invaluable skills. I never completed the traineeship, but it really helped me refine my cooking skills and knowledge. I also gained insight into cookery and experimentation, and learned a lot about mastering the simple before you go off on flights of fancy from my then-boyfriend, who was (and still is!) a chef.

A couple of other factors have influenced my decision to (finally) start this blog. About six months ago, I began getting boxes of organic fruit and vegetables delivered fortnightly - the contents of these boxes were predetermined, so I had to start learning how to cook with veges I normally wouldn't choose for myself! This experimentation kicked off my interest in cooking again.

I was recently diagnosed as insulin resistant, and have to start a low GI diet. Fortunately, I can stay vegan, and the low GI diet isn't that much of a stretch from veganism. However, it means that I have to look at what I'm eating, how I'm cooking, and experiment to make sure that I'm providing myself and my friends with healthy and tasty food.

And, last but not least, I just bought a really sexy digital camera just so's I could take photos of food!

So, welcome to my recipe blog. I do have to note that I'm a "cook from scratch" kind of gal - most of my recipes require a fair amount of prep, and often will take at the very least about an hour to cook. I find it incredibly soothing to come home from work and throw myself straight into food prep and cooking - it kicks off the creative side of me. So be warned - most of these are not quick, though hopefully most of them are easy! And second warning - I try to provide measurements, but I'm not very good at that, so it'll be a bit slapdash. And third warning - I won't provide nutritional information, 'cos I'm not really sure about it. Oh, and fourth warning - I will use brand names, not because I'm getting paid, but because it helps to know what vegans can and can't use from the supermarket.

I hope you enjoy it as much as I'm looking forward to putting together meals and posting the recipes here!

Tuesday, October 17, 2006

What to do with those pesky leftover veges?

Warning: I am incredibly long winded, so be prepared to be here for a while...

I get fortnightly deliveries of fresh organic vegies (if you're in the Sydney area, check out Lettuce Deliver - great, fresh food, friendly family business) and often when it's the day before delivery of the new box I have still lovely but generally a bit unhappy bits of veges left. I usually make a shepherd's pie in those situations, but decided on a Lentil and Vege lasagne this time around.

Ingredients

Lentil and Vege Sauce:

Half a cup of uncooked red lentils, rinsed
1 can of brown lentils
2 cans of chopped tomatoes
minced garlic (much as you like - I like a lot!)
minced shallot/spring onion/onion (see garlic for amount)
1/2 broccoli stem, peeled and diced
1/2 broccoli head, chopped small
handful of beans, diced
2 handsful of mushrooms, sliced
1/2 green capsicum, diced
1/2 handful chopped basil
juice of one lemon
pepper sauce, or good grinding of black pepper to taste
salt/stock cube (optional)
splash of vegan worcestshire sauce (Newmans is generally a safe bet)
splash of extra virgin olive oil (do not fear the olive oil - this is a good fat)

Casheez Sauce

This is not my recipe, unfortunately, but from a post by Dragonfly at vegweb. I highly recommend trying this out - it's a dry mix that is made from cashews, nutritional yeast, salt, onion powder and garlic powder. I add pepper and mustard to give it a little more bite. You then mix half a cup of the dry mix with 1 cup of water and heat it until it thickens. I actually use a double amount for my lasagne (1 cup dry mix, 2 cups water).

If you don't have the time, patience, facilities or interest in making the casheez, then a cheesy white sauce is the go:

Cheezy White Sauce

1 to 2 tablespoons Nuttelex
2 to 3 tablespoons plain flour
2 to 3 cups soy milk
nutritional yeast, salt, pepper to taste

Additional ingredients

Lasagne sheets - San Remo are a good bet for vegan pasta.

For this lasagne, I added in layers of roughly chopped rocket and basil. I often thinly slice and steam sweet potato, adding it in layers to replace some of the Casheez/White Sauce. None of this is necessary, but does add a nice complexity of flavours to the dish.

Process

Lentil and Vege Sauce

Heat the oil in a large heavy bottomed saucepan, over a medium hot flame/heat. Toss in the garlic and shallots, and cook until translucent and fragrant. Add the broccoli stems and beans, and cook for a couple of minutes. Add the broccoli heads and capsicum, and cook for another couple of minutes. Pour in both the red and brown lentils and stir through vigourously. The mix will start to stick a little, so movement is very important to make sure it doesn't burn.

Throw in the mushrooms and toss quickly. Pour in the splash/es of worcestshire sauce and pepper sauce/grinding of pepper. Pour in both the tins of tomatoes, and fill one of the tomato tins with water. Stir the tomatoes through the vege/lentil mixture. Add the lemon juice and the water (from the tomato tin, remember?) If you're using salt or stock, add it now.

Keep the mixture at a fairly medium high heat, and stir regularly. When the liquid has cooked off, and the mixture is thick and maybe even sticking a little, take it off the heat and set aside. Now, cook your Casheez/White Sauce.

Cheezy White Sauce (see Ingredients for Casheez Sauce process)

In a heavy bottomed saucepan, above a medium heat, melt the Nuttelex. When melted, add the flour and stir until fully combined and cooked (but not coloured). You can add the nutritional yeast now, if you want - just gets it out of the way! Add all the soy milk slowly, making sure that no lumps appear) and stir continuously until thickened - around the consistency of very thick cream. Season with salt and pepper.

Layer upon layer upon layer

In a square/rectangular, relatively deep, casserole or baking dish, place a little of the lentil and vege sauce in the bottom. Place lasagne sheets on top, and then top them with enough of the Casheez/White Sauce to thinly coat them. At this point, I added some rocket and basil, and then another layer of lasagne sheets. Keep piling it all up, alternating sauces (don't use too much of the Casheez/White Sauce - you want that for the top!) and other ingredients. Finish with a layer of lasagne sheets and top with a thick layer of Casheez/White Sauce - making sure it covers every section of the lasagne sheets.

Pop into a hot oven (around 200 degress celcius) and cook for about 35 minutes, or until the pasta is tender. It's a good idea to turn the dish at about half way through the cooking cycle.

Let the lasagne sit in its dish for a few minutes, then slice up and serve with lots of salad greens!


Share and enjoy!